We recently released Neon’s remote MCP server. In this post, we’ll dive deep into how we implemented Neon’s remote MCP server. We’ll explore using Server-Sent Events (SSE) for communication and integrating OAuth 2.1 for authentication. So let’s dive in.
Note: If you’d rather watch a video about remote MCP server implementation, there is a great video by Sentry’s founder, David Cramer, who explains his in details.
What is MCP in the Context of Neon?
The Model Context Protocol (MCP) is an open standard that allows large language models (LLMs) and AI agents to interact with external systems in a structured way. In simpler terms, MCP defines how an AI agent (like an IDE plugin or Claude Desktop app) can talk to an MCP server that exposes certain actions or tools.
Neon’s MCP Server bridges natural language commands from an AI agent to actual Neon API calls on the Neon Postgres platform. For example, Neon’s MCP server provides “tools” for tasks like creating projects, running SQL queries, managing branches and others, allowing an AI assistant to execute commands like “List all my Neon projects” or “Create a new Postgres database called my_database” on behalf of a user.
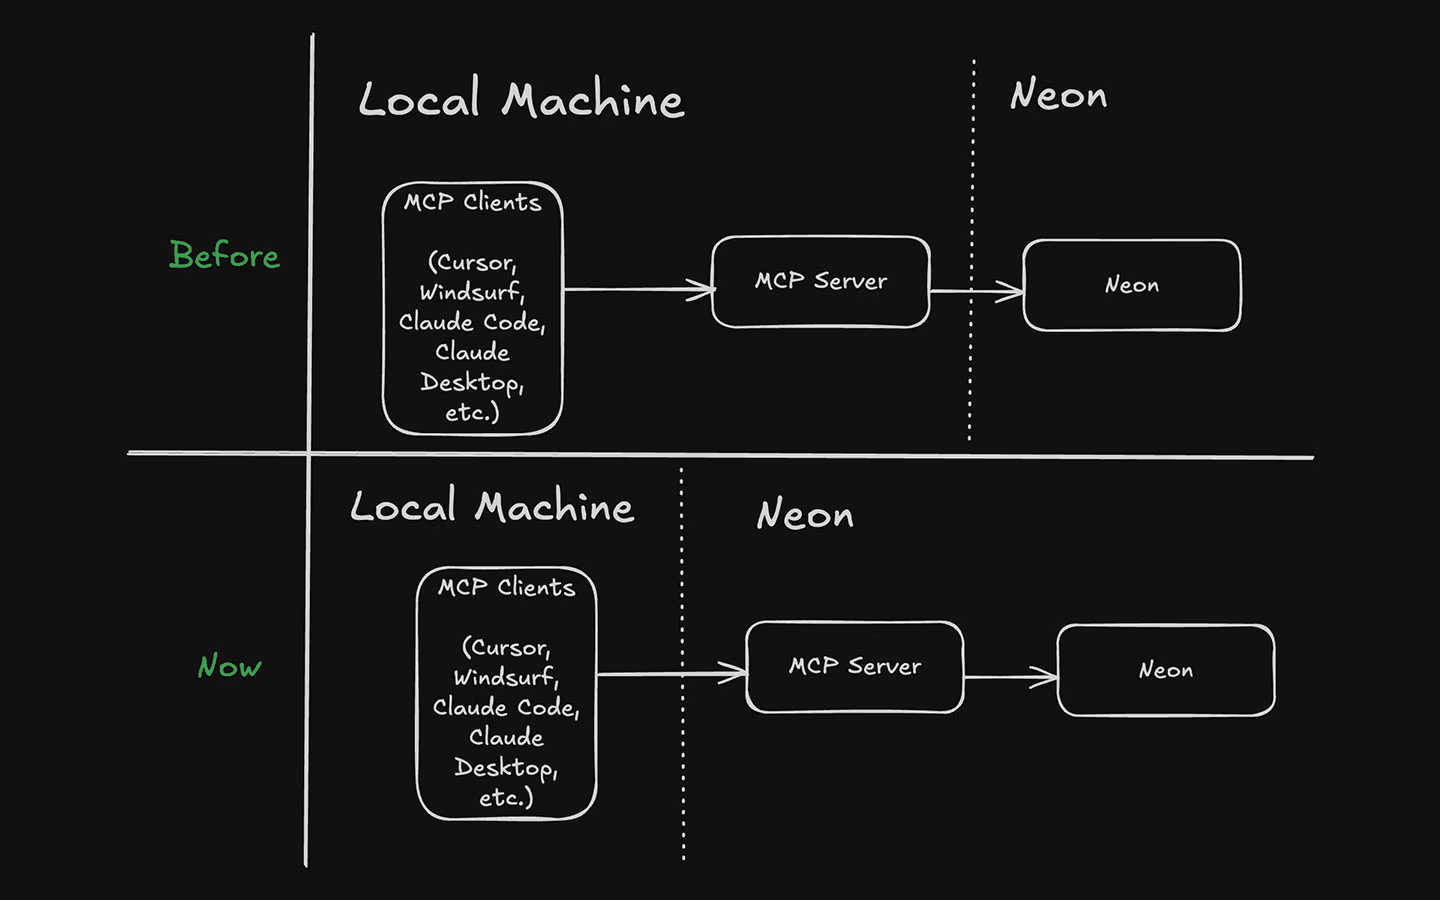
Originally, Neon’s MCP Server ran locally using (via npx @neondatabase/mcp-server-neon) along with the client. The server required a Neon API key for authentication. The MCP client (e.g. Claude Desktop) would spawn the server as a subprocess and communicate via standard I/O. This local MCP setup proved that an AI agent can manage Neon resources using natural language, but there were a couple of pain points that stood out:
- Installation experience: Requiring manual installation and a Neon API key created friction for users.
- Upgrades: Users had to manually update the local MCP server to get access to new tools. Not ideal.
- Security: Handing around long-lived API keys isn’t without a risk, and we wanted a more secure, user-friendly authentication method.
There was another driver, too: the MCP spec itself was starting to evolve in this direction, with native support for remote transports and OAuth authorization flows. We wanted to build toward that future.
Designing the Remote MCP Architecture
To enable remote access, the team had to implement the following:
- SSE + HTTP for bi-directional communication: The local server used a direct stdio pipe to communicate with the AI client. We used a package called mcp-remote that bridges local stdio-based MCP clients with remote MCP servers over HTTP/SSE. mcp-remote mimics a local server from the client’s perspective (via
stdio), but under the hood it sends requests to the remote endpoint and pipes responses back. - An OAuth 2.1 Authorization Flow: Rather than requiring a Neon API key in plaintext, the remote server implements an OAuth flow where users log in to Neon and authorize the MCP server. This way, the server obtains a Neon access token and issues its own token to the MCP client.

Additionally, we:
- Refactor the server to support both stdio (for local mode) and sse (for remote mode) operation.
- Introduce an Express.js web server to handle HTTP connections for SSE and OAuth.
- Implement the OAuth flow with Neon as the upstream provider, including support for refresh tokens.
- Use a persistent store to save OAuth client registrations, authorization codes, and tokens.
- Perform a security review focusing on OAuth best practices (PKCE, redirect URI validation, secure token handling).
Pull Request #36: “Support for /sse and OAuth flow” encapsulated most of this work, spanning changes across the codebase. Let’s break down how these pieces were implemented.
Implementing SSE for remote communication
The MCP protocol involves a back-and-forth message exchange between client and server. The protocol allows you to use SSE for server→client messages, and HTTP POST for client→server messages. We added a new Express route at /sse to handle SSE connections, and a /messages endpoint for incoming messages.
When a client connects, it issues a GET request to /sse with an Authorization header. The Neon MCP server treats this as the start of a session. In the implementation, the server code creates a new SSE transport instance for the connection and associates it with a unique session ID:
app.get('/sse', bodyParser.raw(), requiresAuth(), async (req, res) => {
    const accessToken = extractBearerToken(req.headers.authorization as string);
    const transport = new SSEServerTransport('/messages', res);
    transports.set(transport.sessionId, transport);
    logger.info('new sse connection', { sessionId: transport.sessionId });
    res.on('close', () => {
        logger.info('SSE connection closed', { sessionId: transport.sessionId });
        transports.delete(transport.sessionId);
    });
    // Create an MCP server instance bound to this user's Neon token and attach it:
    const server = createMcpServer(accessToken);
    await server.connect(transport);
});
In this snippet, the server first extracts the bearer token (more on what token this is in the OAuth section). It then creates an SSEServerTransport (provided by the MCP SDK) bound to the Express response object, which will stream events to the client. The createMcpServer(accessToken) call builds a new instance of the Neon MCP server logic for this session, using the provided Neon API access token to authorize Neon API calls. Finally, it connects that MCP server to the SSE transport, which begins the protocol handshake over SSE.
On the other side, the client (for example, Cursor or another IDE) opens an EventSource to https://mcp.neon.tech/sse and receives events. But how does the client send commands (like “create_project” or “run_sql”)? This is where the companion /messages endpoint comes in. The SSEServerTransport uses a long-lived SSE channel for outbound data, and expects clients to POST their requests to a separate URL. Neon’s implementation maintains an in-memory map of sessionId -> transport so that when a POST comes in, it knows which session to route it to:
app.post('/messages', bodyParser.raw(), async (req, res) => {
    const sessionId = req.query.sessionId as string;
    const transport = transports.get(sessionId);
    if (!transport) {
        logger.warn('No transport found for sessionId', { sessionId });
        return res.status(400).send('No transport found for sessionId');
    }
    // Hand off the request to the transport to process the MCP message
    await transport.handlePostMessage(req, res);
});
The client includes the session ID (provided by the server via SSE welcome message or as part of the SSE URL) with each POST. The server then finds the right SSEServerTransport and lets it handle the message, which ultimately passes it to the MCP server logic for processing. Responses or results from that command are then sent back as SSE events.
Under the hood, Neon’s MCP server code registers all the supported “tools” (actions like list_projects, create_branch, etc.) with the MCP protocol server object, and it ensures each tool’s handler is invoked with the proper Neon API client context. The refactoring introduced a pattern where each handler function receives a neonClient parameter, so it can make API calls on behalf of that specific session. For example, the handler for “create_project” now looks like:
async function handleCreateProject(neonClient: ApiClient, name: string) {
    const response = await neonClient.createProject({ name });
    if (response.status !== 201) {
        throw new Error(`Failed to create project: ${response.statusText}`);
    }
    return response.data;
}
All Neon API interactions are scoped to the neonClient created with the user’s access token, ensuring user isolation in the multi-session environment.
Integrating OAuth 2.1 for Secure Authentication
The goal here is to allow users to connect and authorize the MCP server to act on their behalf without manually sharing API keys. We achieved this with an OAuth 2.1 authorization flow using the MCP Server as the OAuth provider for downstream and Neon as an OIDC client for upstream, and the MCP server itself acts as an OAuth client to Neon as well as an OAuth server to the MCP client. Let’s unpack that:
- Upstream provider (Neon): The user will log in to Neon (or use their Neon account session) to grant the MCP server access, just like granting permissions to a third-party app.
- MCP server as OAuth client: The MCP server is registered with Neon’s OAuth service (with a client ID and secret). It requests scopes to the Neon API on behalf of the user.
- MCP server as OAuth server: To the MCP client (the AI agent application), the Neon MCP server itself presents OAuth endpoints (/authorize, /callback, /token). The MCP client doesn’t need to know about Neon’s own OAuth; it only interacts with the MCP server’s endpoints to obtain an access token.
We implemented the following endpoints to complete the authorization flow:
- Dynamic Client Registration (POST /register): The server generates a client ID and secret for the MCP client and stores it. We use a simple storage via Keyv to save the client info.
- Authorize (GET /authorize): Neon’s server doesn’t directly validate the user here; instead it initiates the upstream Neon OAuth flow. The code parses the incoming request, packages the parameters (including a generated state and the PKCE challenge) and then redirects the user’s browser to Neon’s OAuth authorization page.
- Callback (GET /callback) the MCP client receives a code from Neon’s MCP server.
- Token Exchange (POST /token) – In the last step, the MCP client exchanges the MCP authorization code for an access token. .
- Refresh Tokens – The /token endpoint handles grant_type=refresh_token and returns a new access/refresh pair to the client.
Deployment
For deployment, we evaluated AWS, Cloudflare, and Fly. We ended up using a Docker image and deployed the MCP server on Fly for simplicity. But we are exploring other platforms for future deployments. The server typically listens on a public URL (mcp.neon.tech) and clients can connect to the /sse endpoint.
Looking Ahead
The remote MCP server is live. You can install it on Cursor or Windsurf as follow:
"Neon": {
  "command": "npx",
  "args": ["-y", "mcp-remote", "https://mcp.neon.tech/sse"]
}
Although remote servers simplify the installation process, it’s still at an early stage. There are a few known issues such as:
- Dependency on Node.js: As you can see on the command above, the server uses mcp-remote. The package makes it easy to migrate a local MCP server into a remote one, but it requires the client to have Node.js installed, which is not an ideal experience.
- Refresh tokens: We noticed that MCP clients at times re-open the OAuth flow instead of using refresh tokens.
As we expect a broader adoption of MCP servers in the future, by developers and non-developers, we are looking into simplifying the installation and configuration process and testing other tools to build MCP servers.
If you’re building with our MCP or curious about plugging into the Neon platform with AI tools, we’d love to hear from you. And if you’re interested in the code, the whole journey is public at neondatabase-labs/mcp-server-neon.
Thanks for reading, and happy hacking!


